


Since the pandemic, most of us have started using online video calls for sprint planning, feature discussions, architectural design discussions, code reviews, team building activities, and so on. Some of these meetings can go on for a couple of hours. And we really don't know how effective these meetings are at different time intervals throughout the meeting duration.
So during our Pune work together week, our hackathon idea was to assess zoom meetings in real-time by analyzing the facial expressions and attention levels of participants and presenting them to the host.
There can be many use-cases where we can leverage the real-time meeting analysis. Some use cases are:
- Host can leverage participants' reactions to improve their presentation.
- Schools can use it to monitor students’ attentiveness during the lecture.
- Exam invigilators can use it to catch malpractices.
Solution Overview
As we aimed towards recognising the facial expressions of participants, we required a live stream of participants' video. Zoom has a way to provide a live RTMP (Real Time Messaging Protocol) stream which can be consumed for further processing.
To consume RTMP live stream, a media server is required which allows us to process video and extract frames from it.
These frames, extracted at specific intervals, can be used to annotate the facial expressions and attention level of participants to provide real-time feedback to the host. Along with frames, the entire video stream can also be stored in HLS format, for later processing.
Detailed Solution
Zoom Live streaming services - With a pro or higher plan account, zoom provides an option to live stream meetings to a custom platform of your choice. An important point to note before starting a stream is that Livestream URLs must be public in order for Zoom to stream to these servers.
Setting Up Custom Live streaming
Custom live streaming can be configured before starting a meeting or during an ongoing meeting. Follow the steps from this post to configure the custom live stream.
For configuration, stream URL and stream key is required, which you can obtain from your media server (discussed further in this post). Once configured, Zoom will publish the live stream to the given stream URL.
The above configuration can also be updated using zoom meeting apis, which will allow us to start and stop live stream using an API call.
Setting up a Media Server
Instead of setting up our own media server and frame capture processing using FFmpeg, we turned to AWS Elemental MediaLive and MediaStore.
AWS Elemental MediaLive is a live video processing service provided by AWS. Using this, you can process any incoming video stream and perform operations on it. For our use case, we used it to process the incoming live stream from Zoom and stored it on AWS Elemental MediaStore.
Let’s get familiar with some terms in MediaLive that we will be using going forward.
Input - An input is a video asset that is to be transcoded and packaged. It may be associated with an input security group and with a channel (which provides details about the transcoding and packaging to perform).
Encode - encode is the smallest component on the output side of a channel.
Output - An output contains the encodes that belong together.
Output group - An output group holds details about the destination for all the outputs in that group.
MediaStore - AWS Elemental MediaStore is an AWS storage service optimized for media. It provides the performance, consistency, and low latency required to deliver live streaming video content.
To setup MediaLive, we need to perform the following steps -
- Create AWS Elemental MediaStore Container.
- Create an RTMP input for MediaLive channel.

In the above URL, rtmp://34.208.211.97:1935/stream1 is the stream URL and a is the stream key.
3. Create a channel.
4. Add 2 output groups to the channel.
4.1. Create a video group - to store chunks of video stream.
4.2. Create a frame capture output group - to capture frames from video streams in a specified interval.
Analyzing Expressions
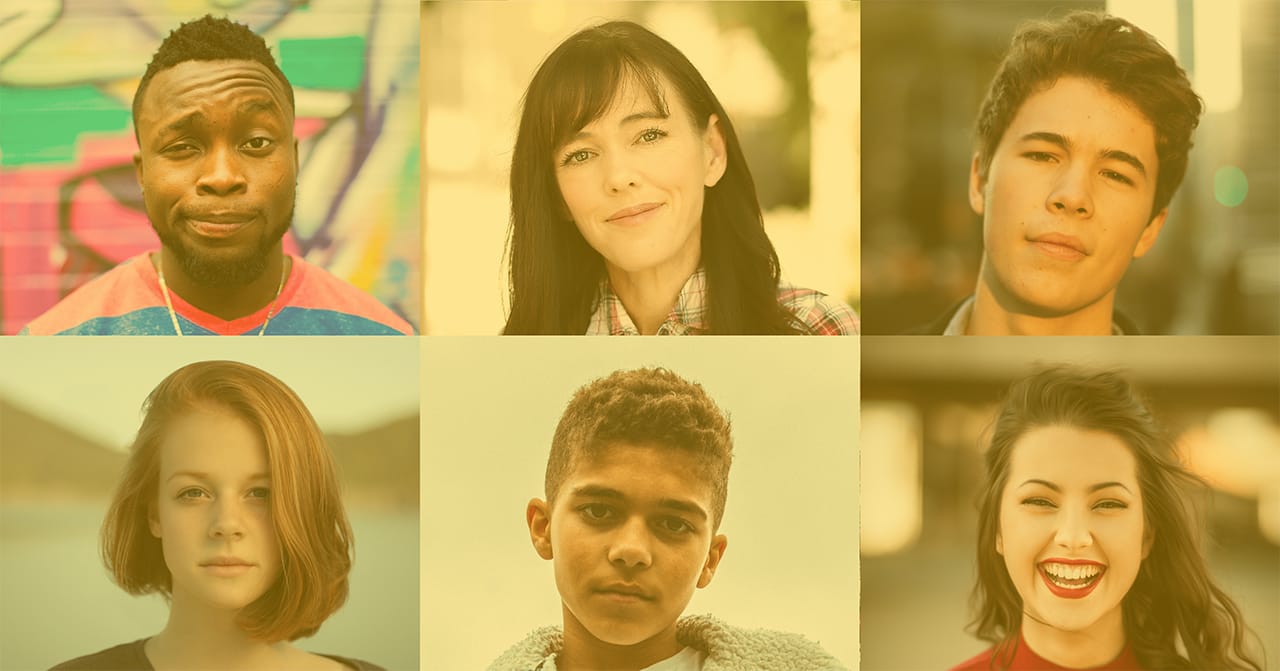
We used Google Vision API to analyze the video frames. Google Vision API offers powerful pre-trained machine learning models through REST and RPC APIs. It can be used for detecting faces in an image, analyzing their expressions, and classifying them into different categories.
A sample response for this image from the google vision api is as follows:

The response shows face annotations for all the faces detected. Expanding one of them, it looks like this:

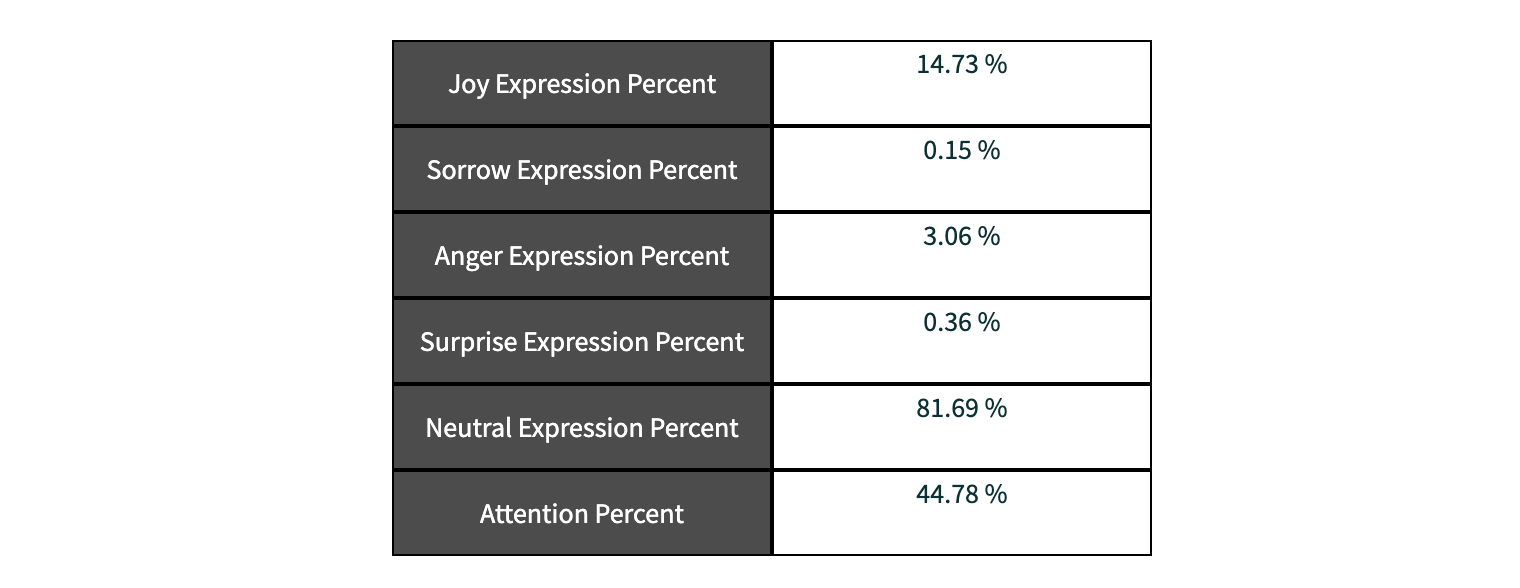
We used the fields - joyLikelihood, sorrowLikelihood, angerLikelihood, surpriseLikelihood for expression analysis.
To determine attentiveness, we used rollAngle, panAngle and tiltAngle. For more information on pose detection angles, refer to this article.
With this setup, we were able to get frames in real-time from zoom meetings. A cron job was setup for further processing of these frames using Google Vision API.
The derived data was stored in a database and was presented to the host in real- time as shown below.

Further Enhancements:
- Cron job can be replaced by a lambda function.
- Individual participants' stream can provide more accurate and insightful results.
- A zoom app can be created to improve the user experience.
- To identify participants and associate facial expressions/attentiveness to those participants, a custom pre-trained ML model can be used.


