In the previous article, We have explained the prerequisite to starting API automation testing with REST Assured.
In this article, We will discuss the setup and installation of the REST Assured API Automation testing environment.
Below are the tools which we require to complete the setup.
Java/ Java Development Kit
As REST Assured is a Java library, so for REST Assured we need to install Java. To check whether Java is already installed or not, Run the below command on the terminal/command line.
java --versionIf the result is displaying content as Java with the version it means Java is already installed else we need to install it.
Last login: Mon Jun 27 19:27:00 on ttys000
nehadadhich@Nehas-MacBook-Pro ~ % java --version
java 18.0.1.1 2022-04-22
Java(TM) SE Runtime Environment (build 18.0.1.1+2-6)
Java HotSpot(TM) 64-Bit Server VM (build 18.0.1.1+2-6, mixed mode, sharing)
nehadadhich@Nehas-MacBook-Pro ~ %
We can install Java from this link.
Once installation is done, please check once again with the java --version command whether it is installed properly or not.
Eclipse
Now we need to install one code editor so that we can write the code. Here we are using Eclipse for REST Assured practice, You can use Microsoft VS, IntelliJ, etc. as per your requirement and ease.
We can install Eclipse from this link , download the package based on Operating system architecture (Windows, mac, Linux, etc.).
Maven
Maven is a build automation tool that will help us to manage our Project, so we need to create a Maven project.
To create a Maven Project in Eclipse we have to follow the following steps :
- Go to “File” >> “New” >> “Project” >>
2. Select “Maven Project” from the options.
3. Set the “Location” (Either Default one or Browse as per your requirement)
4. After setting the location, Click on “Configure” and Add All “Maven Archetypes”
5. Filter the available options with org.apache.maven keyword >> select the latest Archetype having Group id as org.apache.maven.archetypes and Artifact Id as maven-archetpye-quickstart.
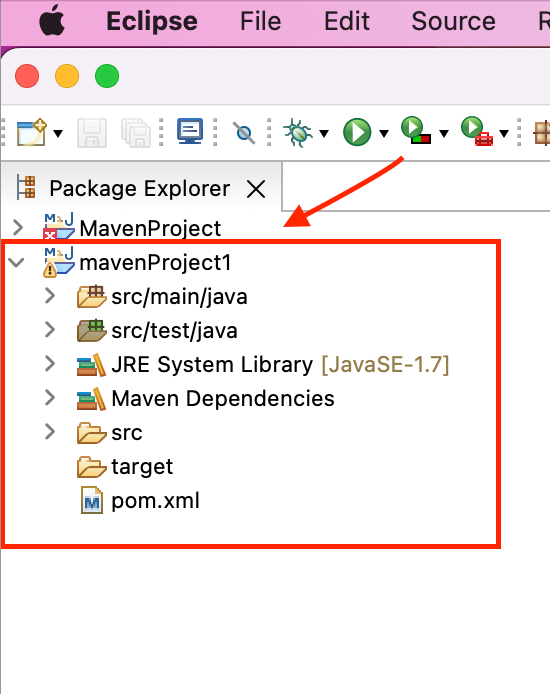
6. Provide any name in artifact id , still, we will suggest creating something related to maven as the same name will display in the sidebar. Here we have used mavenProject1 in the Artifact Id .
7. After finishing, It will look as below image and we can see pom.xml and Maven Dependencies etc as a sub-set of this project.

Now we need to add the testing framework and other dependencies from the maven repository which are present in form of jar files. We add these Jar files so that our Maven project can use those Jar’s functionalities, commands, etc.
Add REST Assured dependency
We need to add REST Assured dependency so that we can test REST services easily.
1. Go to Official site of the Maven repository.
2. Search REST Assured and select the ie.rest-assured one.
3. Click on the latest version and from the Maven tab, copy the dependency.
4. Add this dependency into pom.xml of Maven project in the <Dependencies> tag
Add TestNG dependency
We need to add TestNG dependency (annotations, grouping, and parametrisation) to simplify the testing and for generating the test reports.
- Go to Official site of the Maven repository.
- Search
TestNGand select theorg.testngone. - Click on the latest version and from the
Maventab copy the dependency. - Add this dependency to
pom.xmlof Maven project in the<Dependencies>tag
After adding the dependencies, Save pom.xml and click on Build automatically option from the project section. As soon as we clicked on Build automatically all related jar files which we added in pom.xml will start displaying in Maven Dependencies.
There are some other dependencies too we can add like hamcrest , JSON Object , JsonPath etc. but these dependencies we can add later as per the requirement.
That’s all for installation and setup, In the next article, we will create our first project with REST Assured, and later on, we will start actual Automation testing.


